

Metrology Concepts:
Understanding Test Uncertainty Ratio (TUR)
Test and Measurement Equipment (T&ME) must be calibrated on a periodic basis to assure that it is operating within its specified parameters and if not, aligned so that it performs within its designed specifications. The uncertainty of the calibration system used to calibrate the T&ME should not add appreciable error to this process.
The calibration process usually involves comparison of the T&ME to a standard having like functions with better accuracies. The comparison between the accuracy of the Unit Under Test (UUT) and the accuracy of the standard is known as a Test Accuracy Ratio (TAR). However, this ratio does not consider other potential sources of error in the calibration process.
Errors in the calibration process are not only associated with the specifications of the standard, but could also come from sources such as environmental variations, other devices used in the calibration process, technician’s errors, etc. These errors should be identified and quantified to get an estimation of the calibration uncertainty. These are typically stated at a 95% confidence level (k=2). The comparison between the accuracy of the UUT and the estimated calibration uncertainty is enough to provide reliability of the calibration. Some quality standards attempt to define what this ratio should be. ANSI/NCSL Z540-1-1994 states “The laboratory shall ensure that calibration uncertainties are sufficiently small so that the adequacy of the measurement is not affected” It also states “Collective uncertainty of the measurement standards shall not exceed 25% of the acceptable tolerance (e.g. Manufacturer specifications)”. This 25% equates to a TUR of 4:1. Other quality standards have recommended TUR's as high as 10:1. For some, a TUR of 3:1, 2:1 or even 1:1 is acceptable. Any of these may be acceptable to a specific user who understands the risks that are involved with lower TUR's or builds these into his/her measurement process. When accepting a TUR less than 4:1, it is important to consider the UUT's tolerance band where its “As Found” reading is determined to lie and more important, where the UUT is left during the calibration process.
A 4:1 TUR is the point to which most high-quality calibration labs strive. It is the point at which the level of in-tolerance probability stays at 100% the longest, with the best economies of scale.
In some cases, a 4:1 TUR may be unachievable. Factors that could cause a situation where the TUR is
- Availability of adequate standards
- The technology of the respective T&ME is approaching the intrinsic level of the specific discipline
The user may accept the higher risk associated with the achievable TUR (e.g., 2:1) as opposed to demanding the achievement of a 4:1 TUR. In cases where a 4:1 TUR is necessary, the calibration provider may incur a substantial capital investment expense might lead to an increase in the calibration price, which is the other alternative: choosing to pay higher costs for better measurement assurance (and reduced risk).
Discussion
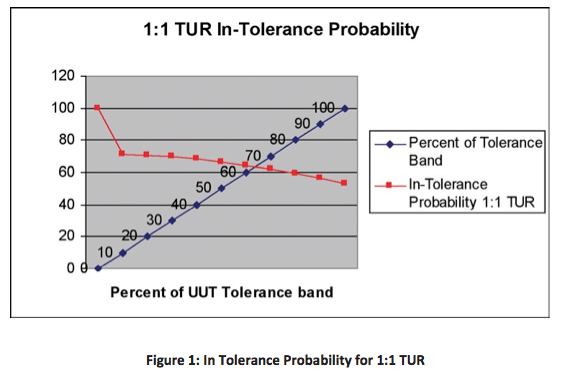
With a TUR of 1:1 (ref. Fig.1) the total uncertainty of the calibration process is as good as, (but not better than), the tolerance of the UUT. If these two instrument readings match exactly whereas the UUT has no error, the risk of the UUT making a measurement outside its specification is limited to its drift. It's now important to estimate how long the UUT will maintain (repeat) the measured value. Most manufacturers determine the drift, or instability, of their product and match these with a recommended calibration cycle to ensure the UUT drift does not exceed its specified tolerance during this cycle or calibration interval. The user needs to be aware of this increased risk. If drift occurs between calibrations, the potential for the UUT to be operating outside of its specifications increases with lower TUR's. T&ME that drifts outside of its designed specifications could proliferate incorrect measurements, which could have detrimental effects on products or systems. The result is that a 1:1 TUR carries a higher risk of the UUT operating outside its design specifications and increases the probability of making bad measurements. However, there are situations that cannot provide better than a 1:1 TUR. This is typically seen at the higher levels in the traceability chain, where complex statistical evaluations and calibration cycle algorithms are performed. Metrologist, Physicists, and Engineers perform work at this level to mitigate the risks involved in transferring measurement between national measurement institutes, such as the National Institute of Standards Technology (NIST).
Users of general purpose T&ME expect their calibration provider to verify that their instruments are operating within their design specifications. The reason for the recommendation of minimum TUR's (such as 4:1 or 10:1) from quality standards (such as Z-540 and 10012) is to ensure that the calibration process can provide a high level of confidence that the instrument is operating within its design specifications. Providing acceptable TUR's isn't always the practice of calibration providers. If the provider does not give an acceptable TUR then they should make the customer aware of the achievable TUR and let the customer make the decision of whether to proceed with the calibration.
Analysis
When an instrument is calibrated, it is either found within or outside of its design tolerance. In the situation of a 1:1 TUR, with the instrument reading exactly at nominal, there's a high probability (approaching 100%) that the instrument is in tolerance. If the instrument is found at the very top of its tolerance band then there is nearly a 50% chance that the instrument is outside of its design specification, regardless of the TUR. Instruments are rarely found exactly at nominal. As Figure 1 demonstrates, for a 1:1 TUR, as soon as the UUT reading deviates from nominal, there's a high probability that the instrument could be outside its design specification, even though the reading implies that it is within its specifications. Even if the instrument is found/left at nominal, there isn't allowance for drift over time and the UUT will likely fail its subsequent calibration or drift outside its design specification during use.
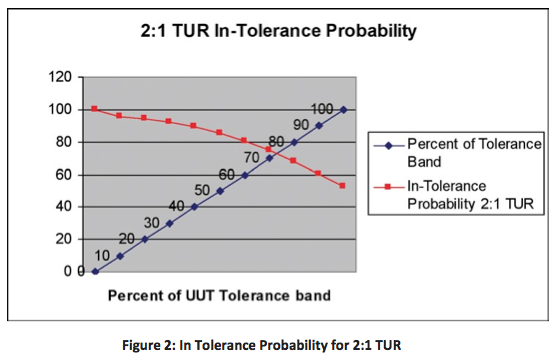
At a 2:1 TUR (Fig 2) there's a higher in-tolerance probability off nominal (which equates to about 35% of the tolerance band) with the in-tolerance probability dropping below 90% at 40% of the tolerance band, and gradually decreases to 50% thereafter.
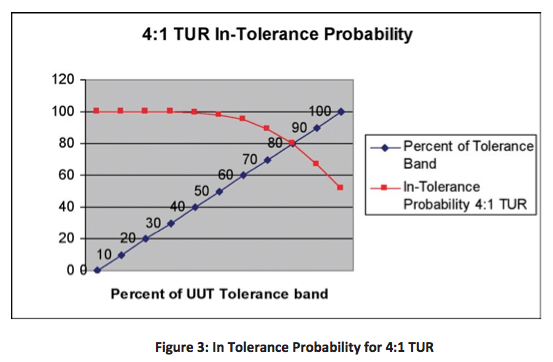
At a 4:1 TUR (Fig 3) the in-tolerance probability stays flat at 100% (to about 50% of the instrument's tolerance band), drops below 90% at 70% of the tolerance band, and then cuts off sharply to 50% thereafter. A guard band adjustment level when the “As Received” reading exceeds 70% of the tolerance would benefit the confidence of the calibration.
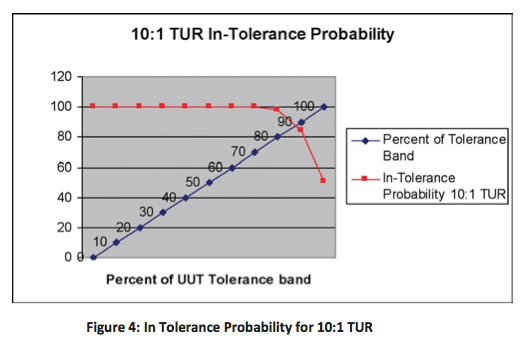
At a 10:1 TUR (Fig 4) the in-tolerance probability stays flat at 100% through approximately 80% of the instruments tolerance band, at which point it drops very sharply to 50%. A guard band adjustment level when the “As Received” reading exceeds 85% of the tolerance would benefit the confidence of the calibration.
Note that it took a change from 4:1 to 10:1 to gain a mere 15% improvement in the guard band level! A 10:1 TUR obviously gives higher confidence than the others mentioned but in many situations, may be impractical due to costs or limits in the technology.
Additionally, a TUR of 100:1 gives approximately 100% confidence that the unit is within its design specification throughout 98% of its tolerance band. However, this is quite impractical due to the cost associated with getting to this level of uncertainty or limits in the technology. To this point, it took a factor of 10 to gain only 15% improvement in the guard band level.
Guard band adjustment by a calibration provider should be a defined process whereas the calibration provider would provide an adjustment to the UUT at 70 % of its tolerance band when a 4:1 TUR is used. This isn't common practice with calibration providers. As a user of MT&E you should question your provider as to whether this “Guard Band Adjustment” process is part of their standard practice or, if not, if this could be provided.
It isn't always possible to provide adjustment to T&ME. Some T&ME that have a fixed value such as gage blocks, fixed mass and fixed resistors, would not be practical to adjust. For this type of equipment, the user must understand the implications and use either certified values in their measurement process or adjust in confidence levels of their measurement process. There may be other situations where adjustment of T&ME is not possible due to adjustment of a respective range of the T&ME. The lower end of the range may need to be adjusted to 80% of its tolerance so the higher end of the range meets its tolerance. In these situations, it would be advisable to demand a higher TUR from the calibration provider.
What values of TUR can realistically be achieved in practice?
This depends on the parameter being measured, the Standard being used, and the current technology available for the measurement. If the technology hasn't been developed to achieve better than, for example, a 2:1 TUR for a specific parameter, then that is the best measurement that can be achieved. It is left to the end-user of the UUT to apply this information properly to their process. As Statistical Process Control becomes more prevalent in industry, TUR values can be achieved by identifying confidence levels in processes and in turn identifying limitations in T&ME used to control those processes. The assumption that T&ME is always giving exact measurements within their respective design specifications must be questioned. Each user must understand how the uncertainties associated with the measurements in their process relate through the chain of measurement traceability. Understanding and properly applying the right TUR can help users assure adequate measurements to the requirements of the process, without spending more than needed to achieve accurate results.
About the Authors
Keith Bennett has been in the metrology field for 25 years and is proficient in multiple disciplines within the field. Keith spent 10 years in the United States Air Force primarily working in the areas of Physical/Dimensional, Primary DC/Low Frequency, and RF/Microwave. Keith's career has progressed from calibration technician to quality process evaluator to master instructor for the USAF Metrology School, Precision Measurement Equipment Laboratories (PMEL). After the military, Keith spent 10 years at Compaq Computer Corporation focused on analytic metrology. Keith currently is the Director of Metrology for Transcat, Inc. He is responsible for planning, initiating, and directing all activities associated with achieving and maintaining accreditation to ISO/IEC 17025 for all 10 commercial calibration laboratories. He assisted in the development of American Society of Qualify Certified Calibration Technician Program (CCT) and was a coauthor of the Metrology Handbook. He is on the Measurement Quality Division Board for ASQ.
Howard Zion has served in progressive roles of responsibility over the course of 22 years in Metrology. From his fundamental and advanced PMEL training in the United States Air Force through his on-the-bench experience with Martin Marietta and with NASA-contractors at the Kennedy Space Center, to his Engineering experience with Philips Electronics, Howard has collected a wealth of knowledge in many Metrology disciplines. He holds a B.S. in Engineering Technology and a M.S. in Industrial Engineering from the University of Central Florida. Howard is currently the Director of Technical Operations for Transcat, Inc.
